
The Amana Smart Thermostat is a cutting-edge‚ Wi-Fi-enabled device designed to enhance home comfort and energy efficiency. With its user-friendly interface and remote access capabilities via the Amana Home app‚ it allows seamless temperature control and scheduling. Compatible with various HVAC systems‚ this thermostat supports voice commands through Amazon Alexa‚ ensuring a modern and integrated smart home experience.
1.1 Overview of the Amana Smart Thermostat
The Amana Smart Thermostat is a Wi-Fi-enabled‚ color touchscreen device designed for compatibility with various HVAC systems‚ including heat pumps‚ gas furnaces‚ and air conditioners. It supports both R-410A and R-22 refrigerants‚ offering flexibility for different setups. The thermostat features a sleek‚ wall-mounted design and is suitable for low-voltage applications. With remote access via the Amana Home app‚ users can adjust settings‚ monitor energy usage‚ and receive system alerts. Its integration with Amazon Alexa enhances convenience‚ allowing voice control for temperature adjustments. Designed for ease of use‚ it includes scheduling and geofencing capabilities to optimize comfort and energy savings.
1.2 Benefits of Using a Smart Thermostat
Using the Amana Smart Thermostat offers enhanced energy efficiency‚ cost savings‚ and unparalleled convenience. It allows remote temperature control via the Amana Home app‚ ensuring comfort even when you’re not home. Voice control integration with Amazon Alexa adds hands-free operation‚ while scheduling and geofencing features optimize energy usage based on your lifestyle. These smart capabilities help reduce energy waste‚ lower utility bills‚ and provide real-time feedback for smarter decisions. The thermostat’s advanced features promote comfort‚ efficiency‚ and seamless integration into modern smart home systems;
System Requirements and Compatibility
The Amana Smart Thermostat is designed for low-voltage HVAC systems‚ ensuring compatibility with most heating‚ cooling‚ and heat pump configurations. It requires a reliable Wi-Fi connection for remote access and smart features. The thermostat is compatible with Amazon Alexa for voice control and integrates seamlessly with the Amana Home mobile app. Proper installation ensures optimal performance‚ with wiring that must conform to local electrical standards. Compatibility with smart home systems enhances its functionality‚ making it a versatile addition to modern homes. Ensure your system meets these requirements for efficient operation.
2.1 Compatible HVAC Systems
The Amana Smart Thermostat is compatible with a wide range of HVAC systems‚ including gas‚ oil‚ and electric furnaces‚ as well as heat pumps. It works seamlessly with conventional PTAC (Packaged Terminal Air Conditioner) units and is designed for low-voltage applications. The thermostat is also compatible with R-410A equipment‚ ensuring versatility for various heating and cooling setups. Proper installation with the correct wiring configuration is essential for optimal performance. Always verify system compatibility before installation to ensure smooth operation and energy efficiency.
2.2 Electrical Requirements
The Amana Smart Thermostat is designed for low-voltage applications only‚ requiring a 24V AC power supply. Before installation‚ ensure all electricity to the HVAC system is turned off. Wiring must conform to local electrical codes and standards. The thermostat is compatible with most standard HVAC wiring configurations‚ including systems with a common wire (C). Proper electrical connections are crucial for reliable operation. Verify voltage compatibility with your HVAC system to avoid malfunctions. Always follow safety guidelines and consult a professional if unsure about electrical requirements.
2.3 Compatibility with Smart Home Systems
The Amana Smart Thermostat seamlessly integrates with popular smart home systems‚ enhancing convenience and control. It is WiFi-enabled‚ allowing remote access and management through the Amana Home mobile app. Additionally‚ it supports voice control via Amazon Alexa‚ enabling users to adjust settings hands-free. Compatibility with smart home systems ensures effortless integration into your connected home‚ offering advanced features like scheduling‚ automation‚ and energy monitoring. This integration enhances overall comfort and efficiency‚ making it a versatile choice for modern smart homes.
Pre-Installation Checklist
Ensure compatibility with your HVAC system‚ turn off power‚ gather tools like screwdrivers and a level‚ and review safety guidelines and wiring diagrams before starting.
3.1 Tools and Materials Needed
To install the Amana Smart Thermostat‚ you’ll need basic tools like a screwdriver‚ wire strippers‚ and a level. Ensure you have a voltage tester to confirm power is off. A wiring harness kit (PWHK01C) may be required for PTAC units. Additional materials include mounting screws‚ a bubble level for accurate installation‚ and a drill for potential wall repairs. Gather all items beforehand to ensure a smooth installation process and proper setup of your smart thermostat.
3.2 Safety Precautions
Before installing the Amana Smart Thermostat‚ ensure the HVAC system’s power is turned off at the circuit breaker to avoid electrical hazards. Verify the thermostat is compatible with your system’s voltage (low voltage only). Always follow the wiring diagram and local electrical codes to prevent wiring errors. Use a voltage tester to confirm power is off. Incorrect wiring can lead to communication errors or equipment malfunctions. Adhere to all safety guidelines to ensure a safe and successful installation without damaging the thermostat or your HVAC system.
3.3 Understanding the Wiring Diagram
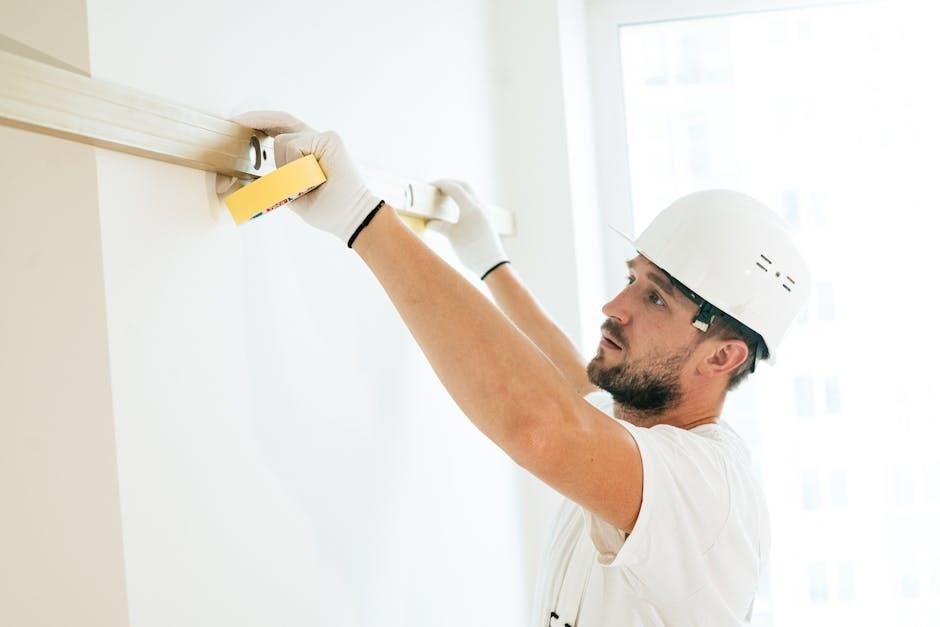
Refer to the wiring diagram in the Amana Smart Thermostat manual to ensure correct connections. Identify the terminals (R‚ C‚ W‚ Y‚ G‚ etc.) and match them to your HVAC system. Proper wiring is essential for functionality. Use the provided wiring harness if available. Ensure all connections are secure and labeled correctly. If unsure‚ consult a licensed electrician. Incorrect wiring can lead to communication errors or system malfunctions. Double-check connections before powering the system back on to ensure safe and proper operation of the thermostat. Use a level to ensure the thermostat is mounted straight for accurate temperature readings.
Installation Steps
Power off HVAC system before starting. Remove the old thermostat‚ then connect wires to the new Amana Smart Thermostat. Mount it level for accurate readings.
4.1 Pre-Installation Checks
Before installation‚ ensure the power to the HVAC system is turned off. Verify the Amana Smart Thermostat is compatible with your HVAC system and operates at low voltage. Choose a location 4-5 feet above the floor with average temperature and good air circulation. Use a bubble level to ensure proper mounting. Gather tools like screwdrivers and wire strippers. Check the wiring diagram for your specific model and ensure all connections match the thermostat’s terminal labels. Confirm the system type (e.g.‚ heat pump‚ gas furnace) is correctly set in the installer settings menu.
4.2 Choosing the Installation Location
Choose a location for the Amana Smart Thermostat that is 4 to 5 feet above the floor to ensure accurate temperature readings. Avoid areas with direct sunlight‚ drafts‚ or extreme temperatures. Select a spot with good air circulation and average room temperature for optimal performance. Use a bubble level to ensure the thermostat is mounted straight. Avoid installing near windows‚ doors‚ or skirting boards. Ensure the location allows easy access for maintenance and usability. Proper placement ensures accurate temperature sensing and reliable system operation.
4.3 Turning Off Power to HVAC System
Before starting the installation‚ ensure the HVAC system is powered off. Locate the circuit breaker or fuse box controlling the HVAC system and switch it off. Verify the system is completely powered down by checking for any airflow or operational sounds. Turning off the power prevents electrical shocks and ensures a safe working environment. For low-voltage systems‚ confirm the thermostat wiring is disconnected. Always follow safety guidelines to avoid potential hazards during the installation process.
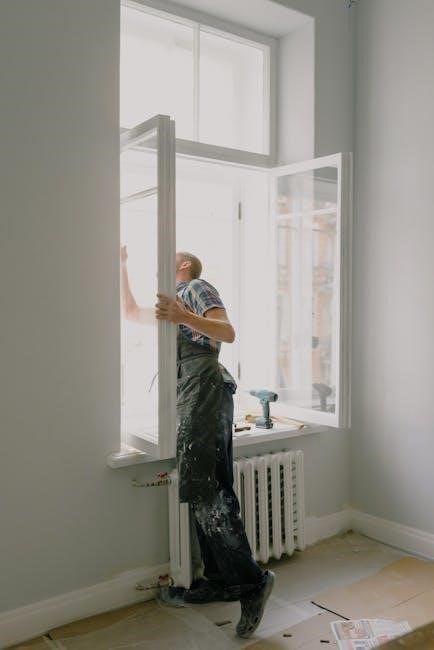
4.4 Removing the Old Thermostat
Before removing the old thermostat‚ ensure the HVAC system is powered off at the circuit breaker. Gently pull the thermostat away from the wall to access the wires. Carefully disconnect the wires from their terminals‚ ensuring not to damage them. Take note of the wire connections for reference during the new installation. Once all wires are disconnected‚ remove the old thermostat from the wall mount. Handle the unit carefully to avoid causing any damage. This step ensures a clean and safe transition to the new smart thermostat installation.
4.5 Installing the New Thermostat
Mount the new Amana Smart Thermostat to the wall using the provided mounting hardware. Ensure the thermostat is level and securely fastened to avoid any tilting. Align the device with the wall studs for maximum stability. If no studs are available‚ use drywall anchors to prevent the thermostat from shifting. Once mounted‚ verify that the thermostat is properly seated and the display is facing outward for easy access. Ensure all screws are tightened firmly to secure the unit in place.
4.6 Connecting Wires to the Thermostat
Connect the wires from your HVAC system to the corresponding terminals on the Amana Smart Thermostat. Match the wires by their color coding (e.g.‚ R‚ C‚ 1‚ 2) to ensure proper functionality. Use the provided wiring harness or connector to secure the wires tightly. Refer to the wiring diagram in the manual for accurate connections. Double-check all wire connections to avoid errors‚ which could lead to communication issues or system malfunctions. Ensure the thermostat is properly powered and all wires are securely fastened before proceeding.
4.7 Mounting the Thermostat
Mount the Amana Smart Thermostat to the wall using the provided bracket. Ensure the surface is level and clean. Use the bubble level tool to confirm alignment. Secure the bracket with screws‚ making sure it is tightly fastened. Attach the thermostat to the bracket by aligning the mounting pins and gently snapping it into place. Verify the thermostat is plumb and level for accurate temperature sensing. Avoid mounting near direct sunlight‚ drafts‚ or extreme temperatures for optimal performance. Tighten all screws firmly to ensure stability.
4.8 Connecting to HVAC System
Connect the wires from the HVAC system to the Amana Smart Thermostat. Ensure wires 1 and 2 from the outdoor unit are securely attached to the corresponding terminals on the thermostat. Verify that the C and R wires are properly connected for power supply. If wired incorrectly‚ the system may not function or display an error. Double-check all connections before restoring power to the HVAC system. Once connected‚ turn the power back on and test the system to ensure proper operation and communication between the thermostat and HVAC components.

Configuration and Setup
Configure your Amana Smart Thermostat by navigating through the menu to set preferences‚ schedules‚ and smart features for optimal performance and energy efficiency. Use the Amana Home app for remote control.
5.1 Initial Setup and Configuration
Begin by turning on the thermostat and following the on-screen prompts to select your system type‚ preferred units (Fahrenheit or Celsius)‚ and time zone. Connect to your Wi-Fi network to enable smart features. Use the Amana Home app to complete the setup‚ allowing remote access and voice control through Amazon Alexa. Ensure all settings are saved before proceeding to advanced configurations.
5.2 Navigating the Thermostat Menu
The Amana Smart Thermostat menu is user-friendly‚ offering easy access to settings like temperature‚ scheduling‚ and system mode. Use the touchscreen to navigate through options such as Home‚ Schedule‚ Energy‚ and Settings. The Home screen displays current temperature and active mode‚ while the Schedule section allows you to set daily preferences. The Energy menu provides usage insights‚ and Settings offers advanced configurations for Wi-Fi‚ Alexa integration‚ and more. Navigate effortlessly to optimize comfort and efficiency.
5.3 Setting Up Smart Features
Enable smart features by connecting your Amana Smart Thermostat to Wi-Fi‚ allowing remote control via the Amana Home app. Link your thermostat to Amazon Alexa for voice commands‚ such as adjusting temperatures hands-free. Set up schedules and automation to optimize energy use based on your routine. Access advanced features like geofencing and energy reports to monitor and manage your HVAC system efficiently. Ensure all settings are configured correctly in the menu to unlock the full potential of your smart thermostat.
5.4 Scheduling and Automation
Set up custom schedules to align with your daily routine‚ optimizing energy usage and comfort. Use the Amana Home app to create temperature presets for different times of the day. Enable geofencing to adjust settings based on your location‚ ensuring energy efficiency when you’re away. The smart recovery feature gradually adjusts temperatures to reach your desired setting by the scheduled time‚ eliminating energy waste. Automation ensures your HVAC system operates efficiently‚ adapting to your preferences and reducing manual adjustments for a seamless experience;

Smart Features and Integration
Enable WiFi for remote access and voice control with Amazon Alexa. Pair with the Amana Home app for seamless smart home integration and advanced automation features.
6.1 Enabling WiFi and Remote Access
To enable WiFi on your Amana Smart Thermostat‚ navigate to the network settings menu and select your home WiFi network. Enter the password to connect. Once connected‚ remote access is activated‚ allowing you to control the thermostat via the Amana Home app. Ensure your router is functioning properly for a stable connection. This feature enables scheduling‚ monitoring‚ and adjustments from anywhere‚ enhancing convenience and energy management. A strong network connection is essential for reliable performance. If issues arise‚ restart the thermostat and router to reset the connection.
6.2 Pairing with the Amana Home Mobile App
Pairing your Amana Smart Thermostat with the Amana Home mobile app allows for remote monitoring and control. Download and install the app from the App Store or Google Play. Open the app‚ create an account‚ and log in. Ensure your thermostat is connected to WiFi. Select “Add Device” in the app‚ and follow the prompts to link your thermostat. Once paired‚ you can adjust settings‚ view energy usage‚ and receive notifications. This integration enhances convenience and ensures seamless control over your home’s climate from anywhere.
6.3 Voice Control with Amazon Alexa
Enhance your smart home experience by enabling voice control with Amazon Alexa. To integrate your Amana Smart Thermostat‚ open the Alexa app‚ search for the Amana skill‚ and link your account. Once connected‚ use voice commands like‚ “Alexa‚ set the living room to 72 degrees‚” or “Alexa‚ switch to eco mode;” This seamless integration allows you to control your thermostat hands-free‚ providing convenience and efficiency. Ensure your thermostat is paired with the Amana Home app and Alexa is logged in to the same account for smooth functionality.
6.4 Advanced Smart Features
The Amana Smart Thermostat offers advanced features that optimize comfort and energy savings. Its geofencing technology adjusts settings based on your location‚ while smart scheduling learns your preferences over time. Energy usage reports provide insights to help reduce consumption. Adaptive recovery ensures your home reaches the desired temperature by your set time. Additionally‚ the thermostat supports custom scenes and routines‚ integrating seamlessly with other smart devices. These features work together to create a tailored‚ energy-efficient‚ and convenient smart home experience.
Maintenance and Troubleshooting
Regularly clean the thermostat and check wiring connections to ensure optimal performance. Troubleshoot common issues like connectivity problems or error codes using the manual or app support.
7.1 Regular Maintenance Tips
Regular maintenance ensures optimal performance of your Amana Smart Thermostat. Clean the device with a soft cloth to remove dust and debris. Check wiring connections periodically to prevent loose links. Ensure the thermostat is installed in an area with consistent temperature and good air circulation; Update firmware regularly for improved functionality. Refer to the manual for detailed cleaning and inspection guidelines to maintain efficiency and extend the product’s lifespan.
7.2 Common Issues and Solutions
Common issues with the Amana Smart Thermostat include connectivity problems‚ incorrect temperature readings‚ and unresponsiveness. For connectivity issues‚ ensure WiFi is enabled and the thermostat is properly paired with the app; If the thermostat isn’t responding‚ restart it by turning off power at the breaker. Check wiring connections for looseness and refer to the wiring diagram for accuracy. Firmware updates can resolve software-related issues; update via the app. If problems persist‚ reset the thermostat to factory settings or contact customer support for assistance.
7.3 Understanding Error Codes
The Amana Smart Thermostat displays error codes to help diagnose issues. Codes like “E-01” indicate communication failures between indoor and outdoor units‚ often due to incorrect wiring. “E-02” may signify sensor malfunctions‚ while “E-03” could point to system configuration errors. Refer to the manual for specific code meanings. To resolve issues‚ check wire connections‚ ensure proper system setup‚ and verify equipment compatibility. If errors persist‚ restart the thermostat or contact customer support for further assistance.
7.4 Resetting the Thermostat
To reset the Amana Smart Thermostat‚ navigate to the “Settings” menu and select “Reset” or remove and reconnect the power supply. This restores default settings‚ clearing schedules and preferences. Ensure all wires are securely connected before resetting. If issues persist‚ consult the manual or contact customer support for assistance. Resetting does not affect WiFi connectivity but may require re-pairing with smart home systems. Always back up custom settings before performing a reset to avoid configuration loss.
Warranty and Support
The Amana Smart Thermostat is backed by a 10-Year Limited Warranty. Online registration is required within 60 days of installation for warranty activation. Dedicated customer support is available for troubleshooting and maintenance assistance.
8.1 Warranty Information
The Amana Smart Thermostat is covered by a 10-Year Limited Warranty‚ ensuring protection against manufacturing defects. Online registration within 60 days of installation is required to activate the warranty. The warranty covers repairs or replacements for defective parts‚ excluding damage caused by improper installation or misuse. For full details‚ refer to the warranty terms in the installation manual or contact Amana customer support. Proper registration ensures eligibility for warranty benefits and extended support services.
8.2 Customer Support and Resources
Amana offers comprehensive customer support and resources to ensure optimal use of the smart thermostat. The dedicated support team is available to address inquiries and provide assistance. Extensive online resources‚ including installation manuals‚ FAQs‚ and troubleshooting guides‚ are accessible on the Amana website. Additionally‚ the mobile app and online platform offer detailed guides for setup‚ configuration‚ and maintenance. These resources empower users to resolve issues independently and make the most of their smart thermostat experience. Amana’s commitment to customer satisfaction is evident through its robust support system.
8.3 Online Registration for Warranty
Online registration for the Amana Smart Thermostat warranty is required to activate the 10-Year Limited Warranty. Registration must be completed within 60 days of installation. Visit the Amana website‚ create an account‚ and enter your thermostat details to validate your warranty. This process ensures your product is recognized and covered under the warranty terms. Failure to register may result in delays or denial of warranty claims. Amana’s support team is available to assist with any registration-related queries or issues. Prompt registration guarantees full warranty benefits andpeace of mind for your smart thermostat investment.
Safety and Best Practices
Always turn off power to the HVAC system before installation. Ensure proper wiring and follow safety guidelines to avoid electrical hazards. Optimize energy efficiency with smart settings.
9.1 Safety Guidelines for Installation
Always turn off power to the HVAC system before starting installation to prevent electrical shocks. Ensure the thermostat is installed in an area with average temperature and good air circulation. Use a bubble level to ensure proper mounting. Follow all local electrical codes and manufacturer instructions. Never attempt to install the thermostat if you are unsure about any step. Keep the area clear of flammable materials and avoid overreaching or standing on unstable surfaces during installation. Remember‚ safety should always be your top priority.
9.2 Best Practices for Energy Efficiency
To maximize energy savings with your Amana Smart Thermostat‚ utilize its smart features like scheduling and geofencing. These tools learn your preferences and adjust temperatures automatically when you’re away or asleep. Regularly update your thermostat’s software to ensure optimal performance. Use the Amana Home app to monitor and adjust settings remotely‚ reducing unnecessary energy use. Consider enabling energy-saving modes during peak hours and adjusting temperature settings by just 1-2 degrees to make a significant impact on your utility bills. Explore all smart features to enhance efficiency and comfort.
Frequently Asked Questions
Common questions include how to enable WiFi‚ connect to Amazon Alexa‚ and resolve wiring issues. These topics are addressed in detail within this manual for user convenience.
10.1 Common Questions About Installation
Common questions about installing the Amana Smart Thermostat include inquiries about required tools‚ such as a screwdriver and bubble level. Users often ask how to turn off power to the HVAC system safely. Wiring connections‚ like identifying and connecting the correct wires to the thermostat terminals‚ are frequent topics. Additionally‚ questions arise about the ideal mounting height and location for optimal performance. These topics are addressed in detail within this manual to ensure a smooth installation process.
10.2 Troubleshooting Frequently Asked Questions
Common troubleshooting questions include resolving connectivity issues with the Amana Home app and addressing error codes like “Communication Error” or “System Not Recognized.” Users often inquire about why the thermostat may not turn on or respond to temperature adjustments. Additionally‚ questions arise about wiring mistakes‚ such as incorrect connections between the thermostat and HVAC system‚ which can cause malfunctions. These issues are typically resolved by checking power supply‚ verifying wiring accuracy‚ and ensuring proper system compatibility.
Thank you for following the Amana Smart Thermostat installation guide. Proper installation ensures enhanced comfort‚ energy efficiency‚ and seamless smart home integration. Enjoy your upgraded smart thermostat experience!
11.1 Final Check and Verification
After installation‚ ensure the thermostat is correctly mounted and wired. Verify the device is 4-5 feet above the floor in an area with average temperature. Check all wire connections to prevent errors. Test the system by switching between heat‚ cool‚ and auto modes. Confirm remote access via the Amana Home app and ensure no error codes are displayed. This final verification ensures proper functionality and a seamless smart home experience.
11.2 Enjoying Your New Smart Thermostat
Congratulations on successfully installing your Amana Smart Thermostat! Now‚ you can enjoy enhanced comfort and energy efficiency. Use the Amana Home app to control temperatures remotely and create schedules. Explore advanced features like voice control with Amazon Alexa for hands-free adjustments. Regularly update settings to optimize energy usage and comfort. Refer to the manual for tips on maximizing your smart thermostat’s capabilities and ensuring long-term performance. With proper use‚ your Amana Smart Thermostat will provide reliable service for years to come.