
The Honeywell TH6210U2001 is a T6 Pro 7-Day Programmable Thermostat designed for efficient temperature control. Its user-friendly interface and energy-saving features make it ideal for modern homes.
1.1 Overview of the Honeywell TH6210U2001 Model
The Honeywell TH6210U2001 is a T6 Pro 7-Day Programmable Thermostat designed for efficient temperature control in residential settings. It features a large, backlit display for easy readability and offers flexible scheduling options to suit various lifestyles. This model is compatible with a wide range of heating and cooling systems, including heat pumps and dual-fuel systems. Its programmable interface allows users to set temperature preferences for different days of the week, ensuring energy efficiency and comfort. The thermostat also supports wireless connectivity through an optional USB module for remote access and advanced control via the Honeywell Home app.
1.2 Key Features of the T6 Pro Programmable Thermostat
The T6 Pro Programmable Thermostat offers advanced features for optimal temperature control and energy savings. It includes a 7-day programmable schedule, allowing users to customize settings for different days. The thermostat features a large, backlit display for easy navigation and a wireless USB module for remote access via the Honeywell Home app. It is compatible with various heating and cooling systems, including heat pumps and dual-fuel setups. Energy-saving modes and vacation settings further enhance its efficiency. The design ensures easy installation and integration with existing HVAC systems, making it a versatile and user-friendly solution for home comfort.
System Requirements for Installation
The Honeywell TH6210U2001 requires a 24VAC power supply and is compatible with most heating and cooling systems, including heat pumps and dual-fuel setups for optimal performance.
2.1 Compatibility with Heating and Cooling Systems
The Honeywell TH6210U2001 is compatible with a wide range of heating and cooling systems, including gas furnaces, heat pumps, and dual-fuel setups. It supports both single-stage and multi-stage systems, ensuring flexibility for various home configurations. Additionally, it works with conventional HVAC systems and newer, energy-efficient models. This broad compatibility makes it suitable for installation in different types of homes, providing reliable temperature control regardless of the existing system; Proper installation ensures seamless integration with any compatible system, maximizing efficiency and performance.
2.2 Power Requirements and Voltage Specifications
The Honeywell TH6210U2001 requires a 24VAC power supply, typically derived from the heating system’s transformer. It is essential to ensure the power source matches this voltage to avoid damage or malfunction. The thermostat is designed to operate within a voltage range of 20VAC to 30VAC, making it compatible with most standard HVAC systems. Proper wiring connections are critical to ensure safe and reliable operation. Always refer to the installation manual for specific voltage and wiring requirements to prevent electrical issues or system incompatibility. Correct power setup guarantees optimal performance and energy efficiency of the thermostat.
Pre-Installation Checklist
Before installing the Honeywell TH6210U2001, ensure you have all tools and materials ready. Verify system compatibility, check power requirements, and review safety guidelines.
3.1 Tools and Materials Needed for Installation
To install the Honeywell TH6210U2001 thermostat, you will need a screwdriver, wire strippers, and a drill with bits for wall mounting. Additionally, ensure you have wall anchors, screws, and a level to ensure proper alignment. A voltage tester is recommended to verify power supply safety. Keep the installation manual handy for reference. Wear safety gloves and eyewear for protection. Make sure all materials are within reach to avoid delays during the process. Proper preparation ensures a smooth and efficient installation experience.
3.2 Safety Precautions Before Starting the Installation
Before installing the Honeywell TH6210U2001 thermostat, ensure the power to your HVAC system is turned off at the circuit breaker or fuse box. Verify the power is off using a voltage tester to avoid electrical shocks. Wear protective eyewear and gloves to prevent injury from debris or tools. Keep children and pets away from the work area. Do not attempt installation during wet conditions or in areas with open flames. Follow all local safety regulations and manufacturer guidelines to ensure a safe installation process. Proper safety measures protect both you and your equipment.
Unboxing and Inventory of Components
Carefully unpack the Honeywell TH6210U2001 thermostat to ensure no damage occurs. Verify all components, including the thermostat, base plate, and mounting hardware, are present.
4.1 Components Included in the Honeywell TH6210U2001 Package
The Honeywell TH6210U2001 package includes the programmable thermostat, a wall mounting plate, screws, wire connectors, and a user manual. Ensure all items are present before installation.
4.2 Verifying the completeness of the Kit
4.2 Verifying the Completeness of the Kit
Before installation, ensure all components of the Honeywell TH6210U2001 package are present. This includes the thermostat, wall mounting plate, screws, wire connectors, and the installation manual; Verify that no items are missing or damaged, as this could delay the process. If any parts are absent or damaged, contact Honeywell support for assistance. Properly checking the kit ensures a smooth and successful installation.
Understanding the Thermostat Design
The Honeywell TH6210U2001 features a sleek, wall-mounted design with a large 5.44-inch backlit display. Its intuitive touchpad controls simplify temperature adjustments and programming.
5.1 Terminal Designations and Wire Connections
The Honeywell TH6210U2001 thermostat requires precise wire connections to function correctly. The terminal designations include:
– R: 24VAC power from the heating transformer.
– Rc: 24VAC power for cooling (if only one R wire is present, it must be shared with Rc).
– Y: Compressor contactor for cooling.
– W: Heat stage for heating systems.
– G: Fan control for circulating air.
– C: Common wire for completing the circuit.
– O/B: Reversing valve for heat pumps.
– AUX: Auxiliary heat for dual-fuel systems.
Proper connections are critical to avoid malfunctions. Always refer to the installation manual for specific wiring instructions, as configurations may vary based on system type.
5.2 Button and Display Layout on the Thermostat
The Honeywell TH6210U2001 features a 5.44 square-inch backlit display for clear visibility. Buttons include navigation arrows for temperature adjustment, a “Hold” button to override schedules, and a “Menu” button for advanced settings. The display shows current temperature, setpoint, and system status. A touch-sensitive interface allows for easy programming. The backlight ensures readability in low-light conditions. The button layout is intuitive, with labels indicating their functions. This design ensures users can easily monitor and adjust settings, making it user-friendly for both basic and advanced operations. The thermostat’s interface is designed to streamline temperature control and scheduling.
Ensure the area is clear and accessible for installation. Verify power supply and wiring compatibility. Choose a wall location with stable temperature and humidity levels. The Honeywell TH6210U2001 thermostat should be installed in a central location, away from direct sunlight, drafts, and extreme temperatures. Avoid placing it near windows, doors, or fireplaces to ensure accurate temperature readings. Ideally, install it at eye level, approximately 52-60 inches from the floor, to facilitate easy operation and visibility. This placement ensures consistent temperature regulation and optimal performance of the thermostat. Proper location selection is crucial for maintaining accurate temperature control and energy efficiency. Always follow the manufacturer’s guidelines for the best installation results. Before installation, verify the Honeywell TH6210U2001 thermostat’s power requirements, typically 24VAC, to ensure compatibility with your HVAC system. Turn off the power supply at the circuit breaker to safely proceed with wiring. Connect the wires to the correct terminals (R, Rc, Y, W, etc.) as specified in the manual. Avoid crossing or damaging wires, and secure them firmly to prevent loose connections. If your system requires a common wire, ensure it is properly connected to maintain consistent power supply. Refer to the installation manual for specific wiring diagrams and voltage specifications to avoid electrical issues. Proper wiring ensures reliable thermostat performance and system operation. The Honeywell TH6210U2001 installation involves mounting the base plate, connecting wires to terminals, and securing the thermostat to the wall. Ensure power is off before starting. To mount the Honeywell TH6210U2001 thermostat base plate, ensure the wall surface is properly prepared. Use a level tool to align the base plate correctly. Drill pilot holes if necessary, then insert wall anchors and screw the base plate into place. Ensure the plate is securely fastened and aligned with the wall. This step is crucial for proper installation and functionality of the thermostat. When connecting wires to the Honeywell TH6210U2001 thermostat, refer to the terminal designations. The R terminal connects to the 24VAC power wire from the heating transformer. The Rc terminal links to the cooling transformer, and if only one R wire is present, join R and Rc using the slider tab. The Y terminal connects to the compressor contactor. Ensure all connections are secure and match the correct terminals. Proper wiring is essential for the thermostat to function accurately. Always turn off the power supply before making any connections. After connecting the wires, mount the thermostat base plate to the wall using the provided screws. Ensure the plate is level and firmly secured. Once the base is in place, align the thermostat with the mounting plate and gently press it until it clicks. Verify that the thermostat is snug and evenly positioned. Double-check that all wires are neatly organized and not pinched. Finally, turn the power back on and ensure the display lights up properly, confirming the thermostat is securely installed and ready for operation. Turn the power supply on at the circuit breaker. The thermostat will begin its initial boot-up process, and the display will light up, confirming successful activation. After completing the wiring connections, locate the circuit breaker or switch that controls the thermostat’s power supply. Flip the breaker to the “ON” position or switch it to enable power. Ensure the power supply is stable and meets the thermostat’s voltage requirements, typically 24VAC. Verify that all wiring is securely connected to avoid electrical issues. Once powered on, the thermostat will begin its initialization process, preparing for configuration and operation. Upon powering up, the Honeywell TH6210U2001 thermostat will perform a self-test, initializing its system and display. The screen will illuminate, showing the Honeywell logo followed by the main interface. Check for any error messages or unusual displays. Ensure the backlight is functional and the touch interface responds to inputs. If the display appears dim or unresponsive, refer to the troubleshooting section in the manual. A successful boot confirms the thermostat is ready for configuration and operation. This step is crucial for verifying proper installation and functionality. The Honeywell TH6210U2001 features a backlit display and touch interface for easy setup. Configure date, time, and temperature settings to optimize performance and energy efficiency. Setting the date and time on the Honeywell TH6210U2001 is straightforward. Use the touch interface or buttons to navigate to the menu, select the date and time option, and adjust using the arrow keys. Ensure accuracy for proper scheduling. After setting, confirm and save changes. The thermostat will update automatically. For added convenience, sync with the Honeywell Home app to maintain consistency. This ensures seamless operation and energy efficiency. Proper date and time settings are crucial for accurate temperature control and scheduling. Configuring temperature settings on the Honeywell TH6210U2001 involves setting desired heating and cooling temperatures. Use the touchscreen or buttons to navigate to the temperature menu. Select the desired mode (Heat, Cool, or Off) and adjust the setpoint using the up or down arrows. You can also set temperature ranges for energy efficiency. The thermostat allows you to program schedules for different days, ensuring optimal comfort and energy savings; For temporary adjustments, use the “Hold” feature to override the schedule. The backlit display makes it easy to view and adjust settings. Proper configuration ensures efficient heating and cooling performance. Programming the Honeywell TH6210U2001 allows you to create a customized weekly schedule and set vacation mode for energy efficiency. The process is user-friendly and intuitive. Creating a weekly schedule on the Honeywell TH6210U2001 allows you to customize temperature settings for each day. Using the thermostat’s display and buttons, you can set specific times and temperatures for heating and cooling. The process involves selecting the day, setting the time, and choosing the desired temperature. The thermostat’s interface guides you through each step, ensuring a seamless programming experience. This feature helps optimize energy usage by aligning temperature adjustments with your daily routine. With a few button presses, you can create a schedule that enhances comfort and efficiency. Setting up Vacation Mode on the Honeywell TH6210U2001 helps conserve energy when you’re away. Access this feature through the Honeywell Home app or the thermostat’s interface. Enable Vacation Mode by selecting the start and end dates and adjusting the temperature settings to an energy-efficient range. This mode ensures your system runs minimally, saving energy without sacrificing comfort upon return. You can also adjust settings remotely if plans change. This feature is ideal for extended absences, offering both convenience and energy savings. Follow the app or manual instructions to activate and customize Vacation Mode. The Honeywell TH6210U2001 offers advanced features like energy-saving modes, wireless connectivity via a USB module, and compatibility with various heating and cooling systems for enhanced efficiency. The Honeywell TH6210U2001 includes energy-saving modes such as Smart Response Technology and Energy Star certification. These features optimize heating and cooling cycles to reduce energy consumption. The thermostat also offers programmable setpoints and vacation mode for added efficiency. Additionally, it supports geofencing through the Honeywell Home app, allowing users to adjust settings based on their location. These options ensure minimal energy waste while maintaining comfort, making it an eco-friendly choice for homeowners. Proper installation and configuration are crucial to maximize these energy-saving capabilities. The Honeywell TH6210U2001 supports a Wireless USB Module for remote access via the Honeywell Home app. This module enables users to control the thermostat from smartphones or tablets, offering convenience and flexibility. Features include remote temperature adjustments, scheduling, and geofencing. To use this feature, install the module and configure it through the app. Ensure proper installation and connectivity for seamless operation. This feature enhances energy management and comfort, allowing users to adjust settings even when away from home. Refer to the installation manual for detailed setup instructions. Common issues include power outages, display malfunctions, or incorrect temperature readings. Check wiring connections, ensure proper power supply, and clean sensors for accurate performance. Power-related issues can often be resolved by checking the circuit breaker or fuse box. Ensure the power supply to the thermostat is stable and correctly connected. If the thermostat display remains off, verify that the R and Rc wires are properly connected. For systems with a single R wire, ensure the slider tab connects R and Rc. If issues persist, consult the Honeywell TH6210U2001 installation manual or contact Honeywell customer support for further assistance. Always ensure safety by turning off the power before performing any troubleshooting steps.
Connectivity issues with the wireless module can be resolved by restarting the thermostat and ensuring the module is properly plugged in. Check for firmware updates in the Honeywell Home app. Ensure the router is functioning and within range. Reset the module by removing it, waiting 30 seconds, and reconnecting. If problems persist, refer to the Honeywell TH6210U2001 manual for detailed troubleshooting steps or contact customer support. A stable internet connection is essential for optimal wireless functionality. Always follow safety guidelines when handling electrical components. Regularly clean the display and sensors to ensure accurate temperature readings. Replace batteries when the BATT indicator appears. Check and clean wires for optimal performance. Regular cleaning ensures accurate temperature readings and prevents dust buildup. Use a soft, dry cloth to gently wipe the display and sensors. Avoid harsh chemicals or abrasive materials. For the display, lightly clean in circular motions to remove fingerprints or smudges. The temperature sensor, typically located behind or on the side of the thermostat, should be cleaned with compressed air to remove dust. Clean every 6 months or when visible dust accumulates. Proper maintenance ensures optimal performance and energy efficiency. Always power down the thermostat before cleaning to avoid any damage or electrical issues. The Honeywell TH6210U2001 thermostat may require battery replacement if it operates on battery power. Look for a “BATT” indicator on the display, signaling low battery levels. Use high-quality, alkaline batteries (e.g., AA or AAA, depending on the model). To replace, turn off the power supply at the circuit breaker. Open the battery compartment, usually located on the front or side of the thermostat. Remove the old batteries and insert the new ones, ensuring correct polarity. Close the compartment and restore power. The thermostat should now function normally, maintaining accurate temperature control and energy efficiency. To replace the batteries in your Honeywell TH6210U2001 thermostat, first, check the display for a “BATT” indicator, which signals low battery levels. Use high-quality alkaline batteries, such as AA or AAA, depending on your model. Turn off the power supply at the circuit breaker to avoid any electrical issues. Open the battery compartment, typically located on the front or side of the thermostat. Remove the old batteries and insert the new ones, ensuring correct polarity. Close the compartment and restore power. If the display lights up without the “BATT” indicator, the replacement was successful. Consider setting a yearly reminder to replace batteries proactively. If issues arise, consult the manual or contact Honeywell customer support for assistance. Always handle old batteries safely and recycle them if possible. The Honeywell Home App offers advanced features for the TH6210U2001 thermostat, enabling remote temperature control and scheduling. Download the app from the App Store or Google Play. After installation, create a Honeywell Home account or log in if you already have one. Connect your thermostat to the app by following the in-app instructions, which may require syncing the device via a wireless USB module. Once connected, you can adjust settings, view energy usage, and receive notifications. Use the app to optimize your comfort and energy savings effortlessly from anywhere. Regularly update the app for new features and improvements. For assistance with the Honeywell TH6210U2001, contact Honeywell Customer Support. Visit their official website and navigate to the support section for contact details. You can reach them via phone, email, or live chat. Provide your model number and a detailed description of your issue for efficient resolution. Additionally, refer to the user manual or installation guide for troubleshooting tips. Honeywell’s support team is available to address installation, programming, or connectivity issues, ensuring your thermostat operates optimally. Their resources and expert assistance help maximize your product’s performance and longevity. Verify proper installation, test functionality, and ensure energy efficiency. Check all settings and connections for optimal performance and user satisfaction. After installation, ensure all wires are securely connected to the correct terminals. Turn on the power supply and check the display for proper illumination and responsiveness. Test the thermostat by adjusting temperatures to confirm heating and cooling systems activate correctly. Verify the schedule and settings are programmed accurately. Ensure the device is wall-mounted securely and sensors are free from obstructions. Review energy-saving modes and remote access functionality for optimal performance. If issues arise, consult the Honeywell TH6210U2001 manual or contact customer support for assistance. Proper verification ensures reliable operation and energy efficiency. To maximize energy efficiency, utilize the programmable features of the Honeywell TH6210U2001. Set a weekly schedule aligning with your routine to avoid unnecessary heating or cooling. Enable energy-saving modes to optimize performance without compromising comfort. Regularly review and adjust temperature settings to ensure they match your preferences. The thermostat’s advanced sensors and wireless connectivity provide precise control, reducing energy waste. By following these steps, you can achieve significant energy savings while maintaining optimal home comfort. Proper configuration ensures the thermostat operates efficiently, aligning with your lifestyle and energy goals.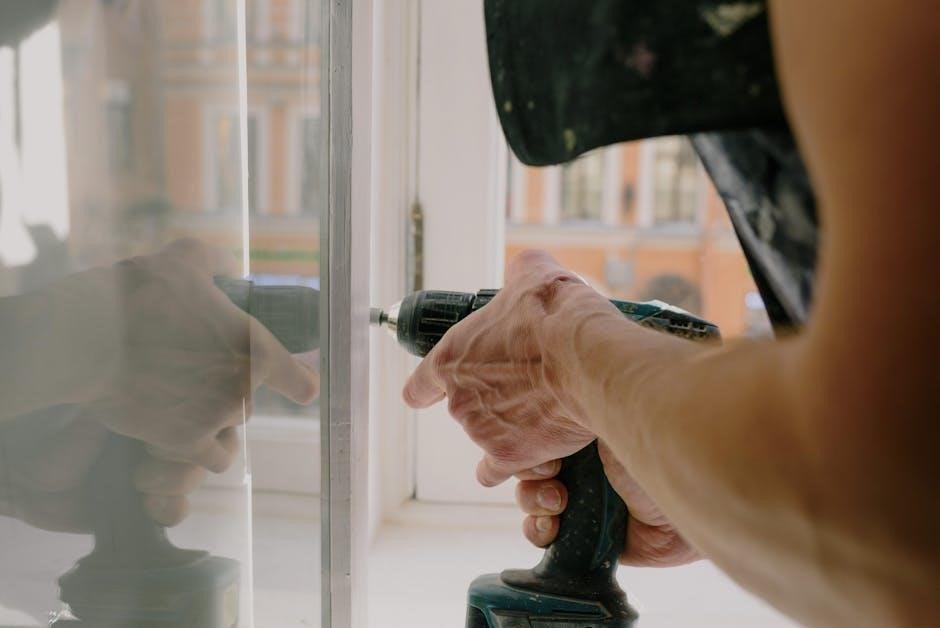
Site Preparation for Installation
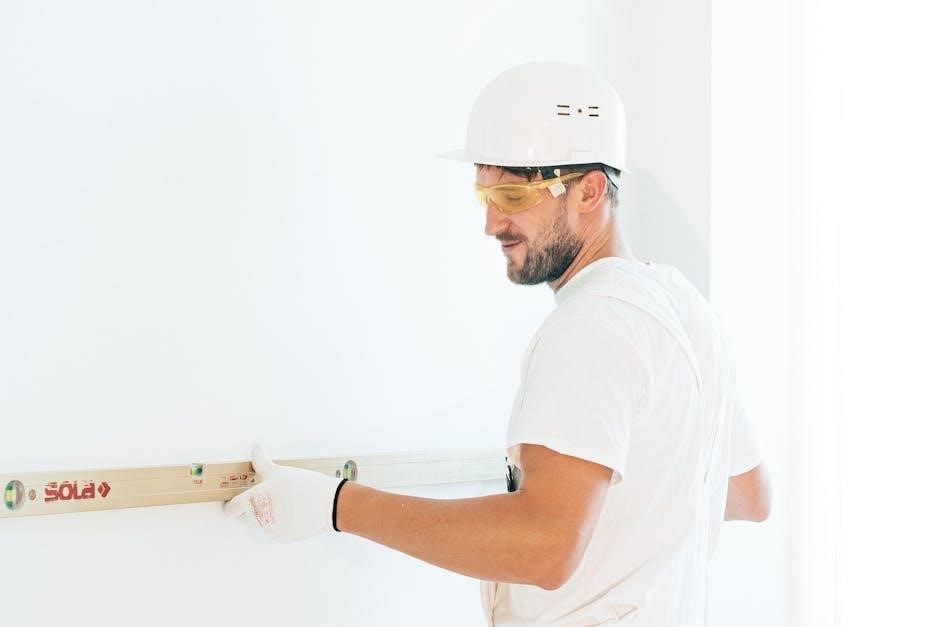
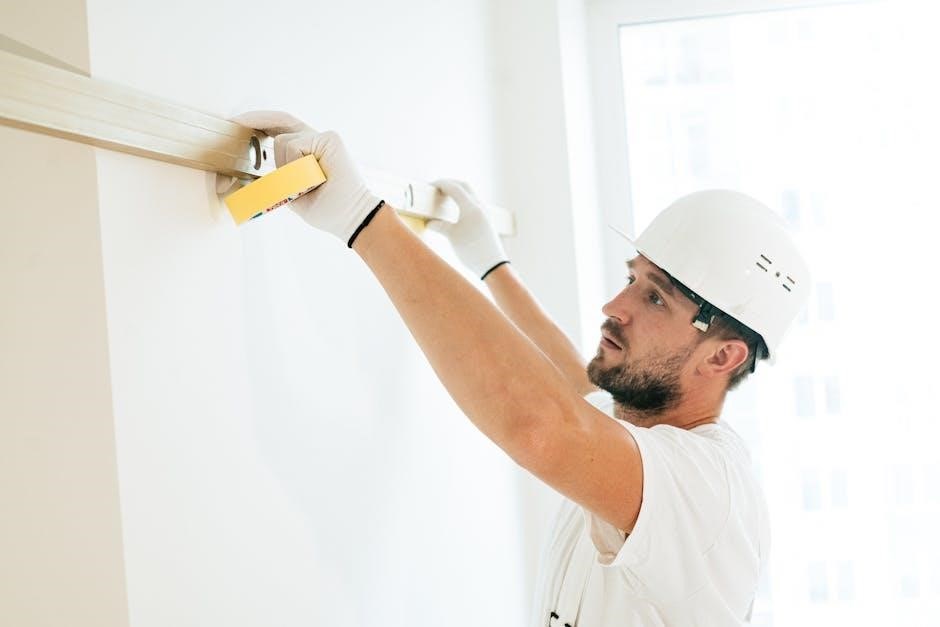
6.1 Choosing the Optimal Location for the Thermostat
6.2 Ensuring Proper Power Supply and Wiring
Installation of the Honeywell TH6210U2001 Thermostat
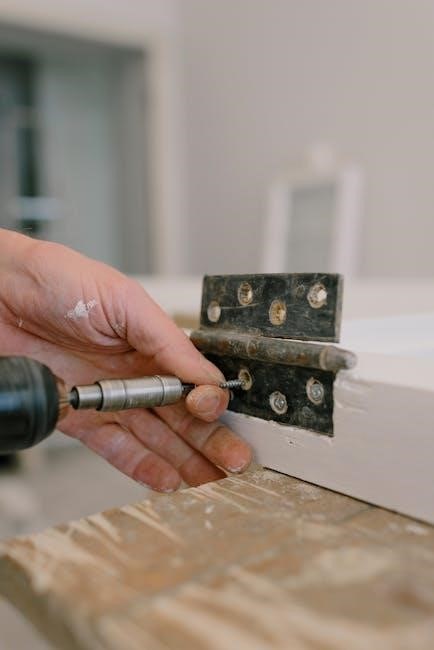
7.1 Mounting the Thermostat Base Plate
7.2 Connecting Wires to the Terminal Designations
7.3 Securing the Thermostat to the Wall
Powering Up the Thermostat
8.1 Turning On the Power Supply
8.2 Initial Boot-Up and Display Check
Initial Setup and Configuration
9.1 Setting the Date and Time
9.2 Configuring the Temperature Settings
Programming the Thermostat
10.1 Creating a Weekly Schedule
10.2 Setting Up Vacation Mode
Advanced Features of the Honeywell TH6210U2001
11.1 Energy-Saving Modes and Options
11.2 Using the Wireless USB Module for Remote Access
Troubleshooting Common Issues
12.1 Resolving Power-Related Issues
12.2 Fixing Connectivity Problems with the Wireless Module
Maintenance and Upkeep of the Thermostat
13.1 Cleaning the Thermostat Display and Sensors
13.2 Replacing Batteries (if applicable)
Additional Resources and Support
14.1 Accessing the Honeywell Home App for Advanced Features
14.2 Contacting Honeywell Customer Support
15.1 Verifying Proper Installation and Functionality
15.2 Ensuring Energy Efficiency and Performance